How to Use a Gua Sha Tool: Your Step-by-Step Guide
Unlock the ancient secrets of glowing, healthy skin with your gua sha tool! This guide will take you through everything you need to know about incorporating this time-honored practice into your skincare routine.

Before You Start: Gather Your Essentials
To maximize the benefits of your gua sha tool, you’ll need:
- A clean gua sha stone
- A gentle facial cleanser
- A nourishing facial oil, serum, or moisturizer (to allow smooth gliding and prevent tugging)
- A mirror to guide your movements
Step 1: Prepare Your Skin
Cleanse: Start by cleansing your face to remove any dirt, makeup, or oil. This ensures that your gua sha session is hygienic and your skin can fully absorb the nutrients from your facial oil or serum.
Hydrate: Lightly mist your face with a toner or hydrating spray if desired, to keep your skin plump and ready for the next step.
Apply Facial Oil or Serum: Apply a generous layer of facial oil or serum to your skin. This provides a smooth surface for the gua sha stone to glide effortlessly, minimizing any pulling or irritation.
Step 2: Hold Your Gua Sha Tool Correctly
Hold the gua sha stone at a 15 to 30-degree angle against your skin. The stone should be nearly flat, with the edge gently pressed to your skin, not perpendicular or digging in.
Step 3: Follow These Techniques
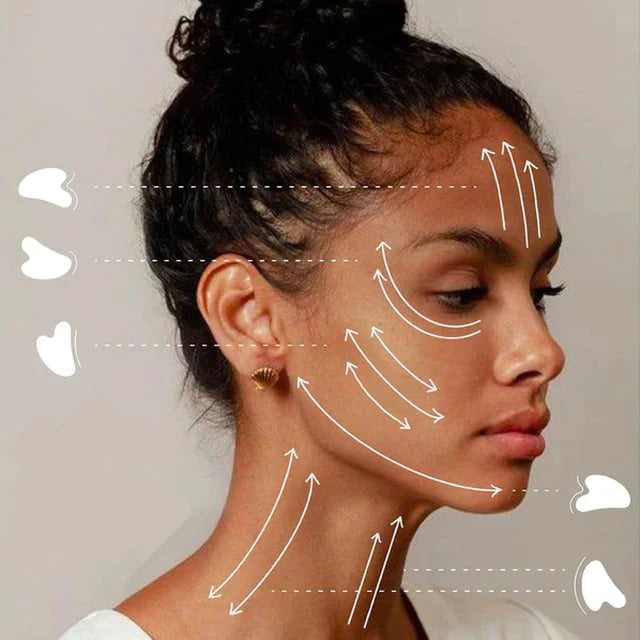
Move the gua sha stone in upward and outward strokes, always gliding toward your lymph nodes or natural drainage points. Apply light to medium pressure—gentle enough to avoid discomfort but firm enough to stimulate circulation.
1. Neck
- Start at the base of your neck and glide the tool upward toward your jawline. Repeat 5–7 times on each side.
- Then, stroke downward from the ears to the collarbone to promote lymphatic drainage.
2. Jawline & Chin
- Place the gua sha tool at the center of your chin, and gently glide it along your jawline toward your earlobe. Repeat 5–7 times on each side.
3. Cheeks
- Start at the side of your nose and glide the tool outward toward your ear. Use the flat edge for broad strokes. Repeat 5–7 times on each side.
4. Under-Eye Area
- Use the curved edge or smaller side of the tool. Gently sweep from the inner corner of your eye outward toward your temple. Be very light with pressure in this delicate area. Repeat 5 times on each side.
5. Brow Area
- Starting at the center of your forehead, use the curved edge to glide across your brow bone toward the temple. This can relieve tension and reduce puffiness. Repeat 5–7 times on each side.
6. Forehead
- Begin at the center of your forehead, just above your brows. Glide the tool upward toward your hairline in long, even strokes. Repeat 5–7 times, covering the entire forehead area.
Step 4: Cool Down & Finish
Relax & Observe: After your gua sha session, your skin may look slightly flushed. This is normal and a sign of increased blood flow.
Clean Your Tool: Wash your gua sha stone with warm water and a mild soap, then dry it completely before storing it in a clean, safe place.
Moisturize: Apply a light moisturizer to lock in the benefits of your facial oil or serum.
Pro Tips for Gua Sha Success
Be Consistent: Use your gua sha tool 3–5 times a week for the best results. Regular use promotes better circulation and lasting skin improvements.
Stay Gentle: Avoid using too much pressure—gua sha is meant to stimulate, not bruise.
Keep it Cool: For an extra soothing experience, chill your gua sha stone in the fridge before use to reduce puffiness.
Listen to Your Skin: If you have sensitive or acne-prone skin, go slow and avoid active breakouts to prevent irritation.
Benefits of Gua Sha
- Stimulates blood circulation
- Reduces puffiness and inflammation
- Improves skin tone and elasticity
- Promotes lymphatic drainage
- Relieves muscle tension and tightness
By following these steps, you can make gua sha a calming, effective part of your skincare routine. Ready to glow? Pick up your gua sha tool and let the ritual begin!